Click around in the above demo to see how to configure your own contracts in Worksuite!
When managing dozens or hundreds of contractors, chances are you’ve had to juggle your fair share of agreements, NDAs and other paperwork. Legal documents like these keep you compliant as you engage your freelancer workforce. You can configure your own Contracts directly within Worksuite — and we’re going to show you how.
Worksuite’s Self-Serve Contract Configuration Lets You:
- Stay Compliant at Scale: Simply upload a reusable contract template, configure the fields and go. No more back-and-forth to collect document signatures. One-time setup, countless hours saved.
- Customize Your Configuration: Choose where you want the dates, names, addresses, etc. to appear in the contract. Even pre-fill data that you’re already collecting.
- Save Clicks (and Mental Switching Costs): Easily select signers from a dropdown that pulls from your database.
- Maintain Safety and Security: Rest easy knowing that the right agreements are being sent & signed on your behalf.
- Focus on What Matters: Free up your time to focus on the relationship aspect of your talent network instead of the paperwork.
How to Configure Your Contracts for E-Signature
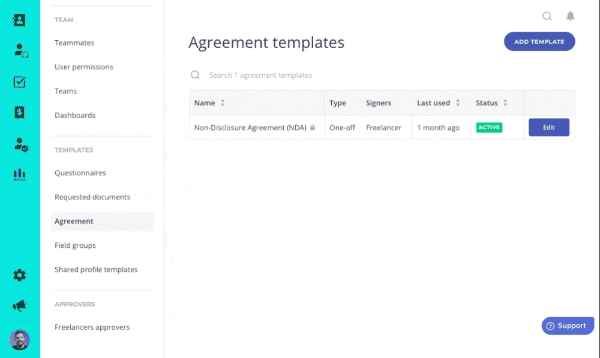
- In your Worksuite, navigate to Settings > Agreement > Add Template.
- Choose an agreement type.
- Add an Agreement Name, then Upload the appropriate file, and select any relevant Merge Fields from the dropdown (e.g. First Name, Last Name, Address).
- Click the Setup Agreement button.
- Drag & drop Signature Fields and Merge Fields.
- You’re all set to send it!
.avif)
.avif)
How to Make a New Agreement Part of an Onboarding Workflow
Note: We’ll cover Automated Onboarding Workflows later in the course. Jump to it here.
Next, you can make this Agreement Template part of your Onboarding Workflow that automatically collects signatures while you focus on other things.
- Simply navigate to the “Onboarding” module of your Worksuite environment.
- Then find the Workflow that you want to edit (or create a new one). Click the three dots on the right side to Edit the Workflow.
- Add a Stage > select Sign agreement from the dropdown.
- Select the Agreement Template that you’ve just configured, save changes and voila! It’s now updated in your automated workflow with the latest and greatest compliant contract.
.avif)
Voila! A few minutes of setup saves you hours of admin each week.
Exercise
- Upload your first contract template and configure the fillable fields to your needs!
Next lesson
Overview: Talent Directory
View →